Friday 29 November 2013

Toot - A 'lil' something on a Saturday morning

Oh look what I just made for a bunting to go with the vintage fan ripple baby blanket.


Crochet Elephant appliqué with bow 


Squeee.

What a cute little elephant girl... 

Pattern and bunting to come soon.


Stay juicy Planet Earth,

Superfruity 

Thursday 21 November 2013

Ripple me this... A coral and guava vintage fan ripple

When I first started on Pinterest I came across this picture and thought: "wow this is magnificently beautiful. I wish I could make that!"


That was when I first started to crochet again (after about 15 years), and would have never attempted such an intricate pattern- even if there was one... But there wasn't...

 Then, a couple of months later  I spotted this on Pinterest:


Someone deciphered the pattern. Here is the link to the pattern , if you want to have a try.

So now it was only my skills standing in my way...

And for the meantime I made only ripples... Not vintage fan ripples...

But I saw lots of others in the meantime.

For example here is Pip's version from meet me at mike's.

Meet Me At Mike's Vintage Fan Ripple 


Or here is another take on the pattern from chiaki creates:


Chiaki Creates Vintage Fan Ripple 

Another couple of months and about 4 ripple baby blankets later, I plucked up the courage and got to work...

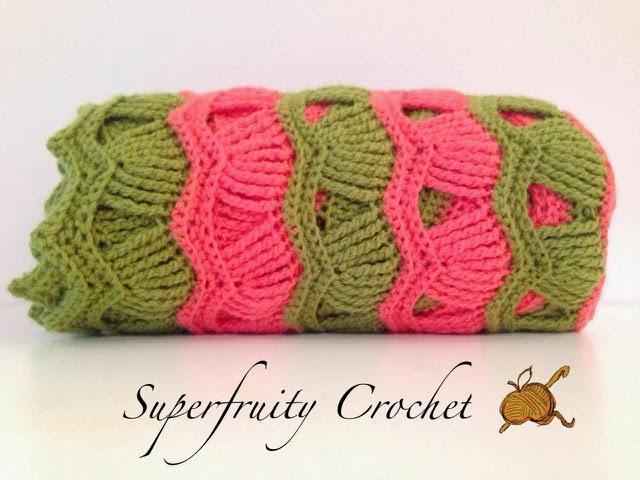
A friend of mine picked theses gorgeous colours Coral and Guava from the Bendigo Woollen Mills classic range for her daughters blanket. A stunning combination that I fell in live with as soon as I held the wool in my hands... 

It was slow going at first trying to figure out the pattern. I found it hard to get the right tension in the fans. I frogged it twice and started again.

Very slowly...

Superfruity Crochet Vintage Fan Ripple Crochet Blanket in Coral and Guava

Row by row...

Superfruity Crochet Vintage Fan Ripple Crochet Blanket in Coral and Guava

Superfruity Crochet Vintage Fan Ripple Crochet Blanket in Coral and Guava

And as I saw the blanket growing in front of me I fell in love with it more and more. What a great pattern. What a beautiful look. And the nice soft feel of the wool. Oh my.

The finished object is just fantastic. 

Superfruity Crochet Vintage Fan Ripple Crochet Blanket in Coral and Guava

Superfruity Crochet Vintage Fan Ripple Crochet Blanket in Coral and Guava

Superfruity Crochet Vintage Fan Ripple Crochet Blanket in Coral and Guava

Superfruity Crochet Vintage Fan Ripple Crochet Blanket in Coral and Guava

I'm sad to send it off to its new home soon, but I know it will be treasured. 

Please contact me through my facebook page if you would like me to make your very own Vintage ripple blanket :)


Stay juicy Planet Earth,

Superfruity 


Sunday 10 November 2013

Hear Me Roar - The Lion Bunting

Hi everyone!

I know it has been way too long since I posted last but I really did want to share this lion bunting pattern with you.

I made this for the first birthday of a special little boy name Leo and love how it turned out!


Hear me roar - crochet lion bunting

The pattern

US terms

You  will need

  • DK yarn in (off) white 
  • Worsted weight yarn in yellow and pumpkin (I used Bernat Super Value)
  • 4.00mm/G hook
  • 5.00mm/H hook
  • 5.5mm/I hook
Stitches:

sl st - Slip stitch
sc - single crochet
Hdc- half double crochet
Dc - double crochet
lp st - Loop stitch


The Bunting 

I got the bunting pattern from Lucy from Attic 24 . I use  4.00mm/G hook and DK yarn and work until I reach 32 stitches in the increase round plus an additional round without increases (so you don't increase on your last row and end with 32 stitches).

The Letters

The letters are from the lovely Moogly Alphabet. I have worked them with worsted weight yarn and a 3.00mm/ C or D hook.


The Lion Head

5.5mm/ I hook

Round 1: Start with a magic circle and ch 2 (does not count as a stitch) and hdc into circle 8 times, join to first ch2, ch 2 (8).

Round 2: 2Hdc in same stitch as ch, *2Hcd in next stitch, *repeat all around, join to 1st Hdc, ch 2 (16)

Round 3: 2Hdc in same stitch as ch, *Hdc in next stitch, 2Hdc in next stitch, *repeat all around, join to 1 st Hdc, ch 2 (24)

Round 4: 2 Hdc in same stitch as ch, *Hdc in 2next stitches, 2Hdc in next stitch, *repeat all around, join to 1st Hdc, ch2 (32)

Round 5: 2 Hdc in same stitch as ch, *Hdc in 3next stitches, 2Hdc in next stitch, *repeat all around, join to  st Hdc, ch 2 (40) 

This is the last round using Hdc the next 3 rounds will be worked using loop stitch.  Here is a good video tutorial for this who are unfamiliar with the loop stitch.

Loop stitch tutorial


Round 6: Turn ( you are now working the wrong side of the circle). change to Pumpkin colour 2 lp st in same stitch as ch, *lp st in 4next stitches, 2 lp st in next stitch, *repeat all around, join to st lp st, ch 2 (48)

Row 7: 2 lp st in same stitch as ch, *lp st in 5next, 2lp st in next stitch, *repeat all around, join to  st lp st, ch 2  (56)

Row 8: 2 lp st in same stitch as ch, *lp st in 6next, 2lp st in next stitch, *repeat all around, join to  st lp st, ch 2  (64) fasten off.


The Nose

with Brown DK yarn 
with 4.00mm/G hook

Row 1 ch5, hdc2tog, hdc2tog, ch1 turn

Row 2 hdc2tog, bind off. 

Leave a long tail so you can use it to sew the nose the lion face later.

Sew nose onto the lion head and embroider the eyes with brown yarn. 


Little Lion Head - crochet appliqué or bunting


The Paws 

with Pumpkin yarn 
make 2
5.5mm/ I hook

Round 1: Start with a magic circle and ch 2 (does not count as a stitch) and hdc into circle 8 times, join to first ch2, ch 2 (8).

Round 2: 2Hdc in same stitch as ch, *2Hcd in next stitch, *repeat all around, join to 1st Hdc, ch 2 (16)

Round 3: 2Hdc in same stitch as ch, *Hdc in next stitch, 2Hdc in next stitch, *repeat all around, join to 1 st Hdc, ch 1 (24)

Next round will be worked with sc.

Round 4: 2 sc in same stitch as ch, *sc in 2next stitches, 2 sc in next stitch, *repeat all around, join to 1st sc, ch1 (32)

 Round 5: Repeat 3 times for three toes:  * sl st, 2 dc in sl st, 2 tr in next, 2 dc in next, ch2 sl st in same stitch as 2 dc* fasten off.


With Yellow yarn

With 4.00mm/H hook
Make 3

Round 1: Do magic circle with 6 sc join, fasten off.  Leave ends long enough to use for sewing


With 5.5mm/ I hook
Make 1

Round 1: Start with a magic circle and ch 2 (does not count as a stitch) and hdc into circle 8 times, join to first ch2, ch 2 (8).

Round 2: 2Hdc in same stitch as ch, *2Hcd in next stitch, *repeat all around, join to 1st Hdc, ch 2 (16), fasten off. Leave end long enough for sewing.

Sew the 3 yellow toes and the smaller paw on the bigger pumpkin-coloured paw.


Little lion paw - crochet appliqué or bunting


Assembly.

Start with the last bunting (here the one with the letter 'O").
I used slight green yarn and sc around the edges of each bunting flag starting at the upper right corner. When you reach the corner again chain 25, sc into the head, chain 4, sc into the head, chain 25 and then slip stitch in chains until you reach the upper right corner of the flag again. 
Slip stitch along the top of the 'O' flag. 
Chain 8, sc into paw, chain 8, and slip stitch back to the 'O' flag, fasten off.  
Get your next flag and join with a sc into the upper right corner. sc around again and add paws and head as described above.

Finished!


Lion crochet bunting in its natural habitat :)

Hope you enjoy this bunting! 

The lion head and paws can of course also be used as appliqués on blankets, sweaters or bags. Have fun with them!

You can sell finished items from this pattern but please include a link to this blog in any advertisement or listings. Thanks.

Stay juicy Planet Earth... 

Superfruity